Siapa yang pernah menerima file asing berbentuk .zip, yang mengatas namakan Facebook sperti gambar sebelah? Jika pernah berhati-hati lho. Bisa jadi itu adalah virus baru bernamaOficla. ... JANGAN DIKLIK FILE ZIP-nya kalau mau selamet.
Sebenarnya Oficla ini mirip dengan Bredolab atauPendex di tahun 2009, karena payloadnya memang mirip. Norman antivirus mendeteksinya sebagai W32/Oficla.FA.
Walau varian awalnya sudah terdeteksi oleh program antivirus di akhir tahun 2009, virus ini memiliki kemampuan mengupdate dirinya setiap kali di deteksi oleh program antivirus dan setiap kali menginfeksi ia akan mendownload virus baru ke situs yang telah dipersiapkannya.
Jika dapat virus ini, bukan cuma scam (email bohong) yang diterima, tetapi email mengandung virus yang akan menginstalkan program jahat dengan isi yang direkayasa sedemikian rupa sehingga sangat meyakinkan sehingga pengguna awam Facebook akan langsung menjalankan lampiran tersebut tanpa berpikir dua kali.
Hal ini terjadi karena perkembangan pembuat malware saat ini sudah bukan programmer iseng yang ingin menunjukkan jati dirinya dengan membuat virus, tetapi ujung ujungnya untuk cari duit, sudah menjadi kejahatan terorganisir dimana membuat virus dan mengarahkan ke Rogue Antivirus / Fake Antivirus sudah menjadi mata pencaharian bagi sebagian kalangan. Pokoke Profi dah Gan ..
Apa Akibatnya?
Akibat yang ditimbulkan oleh virus ini dapat dibilang sangat merepotkan, bukan hanya password Facebook anda yang dapat hilang, tetapi dengan menjalankan virus ini anda sudah memberikan akses pada semua kredensial (username dan password) di komputer anda, termasuk data kartu kredit dan data keuangan lain yang pernah atau akan anda gunakan untuk transaksi online.
Karena itu, salah satu cara yang terbaik untuk terhindar dari virus ini adalah jangan mudah mempercayai apa yang datang di email karena semuanya bisa dipalsukan. Jangankan pesan, gambar atau background yang bisa dibuat semirip mungkin dengan situs Facebook, pengirim (from) juga dapat dipalsukan seakan-akan dari administrator Facebook. Jadi jangan percaya juga begitu aja email dari admin.
Tapi bagi yg pengen tahu dan coba coba virus itu, klik aja zip filenya...
Jumat, 30 April 2010
Selasa, 27 April 2010
OS X Tricks: How to show hidden files on a Mac with the help of Automator.

Unlike Windows, the Mac operating system does not make it easy to view the hidden files on your computer. Apple does this for our own safety since messing with hidden files can get ugly, but in certain cases it still needs to be done.
Although just about anybody could need to at some point, web developers are probably the most common group of people who work with hidden files on a regular basis. For example, the other day I needed to edit a .htaccess file on my server and couldn't find where it went after downloading it to my desktop. I knew it was there, but since the filename starts with a dot (".") Mac OS X is set to hide it by default. Generally this behavior is a good thing, but not in this particular instance.Running a command in Terminal is the most basic way to show hidden files on a Mac. While that method works fine, it sure is a pain to remember the code every time you want to toggle it on or off. Instead, we're going to utilize the power of Automator (which is built into Mac OS X) to create a Finder plug-in that can be easily accessed at any time. Please note this method does not work in 10.6 Snow Leopard.
- Coincidentally, the first step is to launch Automator from the Applications folder. If you've never used this program before, don't worry. It's extremely confusing to newcomers (myself included), but our task for this tutorial is very simple.
- On the left side you should see a list of Actions in the library. Choose Utilities and then double-click Run Shell Script in the next column (or drag it to the workflow area).
- Type the following code into the text box. I wouldn't recommend copying and pasting directly because the apostrophes & quotes have a tendency to get screwed up.
defaults write com.apple.finder AppleShowAllFiles TRUE
osascript -e 'tell application "Finder" to quit';
osascript -e 'tell application "Finder" to activate';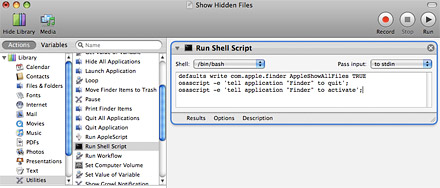
- In the menu bar, go to File > Save As Plug-In. Type in a name like "Show Hidden Files" and click the Save button.
- Since it's not a good idea to leave hidden files turned on all the time, we also need to create a plug-in which brings things back to normal. Keeping the same command as before, simply change TRUE to FALSE in the workflow and go to File > Save As Plug-In again. This time name it "Hide Hidden Files" and click Save.

Sabtu, 24 April 2010
Assemble A No-Fuss Mailing List Using Zotero & Gmail.
Say goodbye to 'copy & paste'. There are easier ways to organize information. Zotero, a handy Firefox extension, picks up whereGoogle's ailing Notebook application leaves off.
Marketed as a research tool, it is actually a tiny miracle. Not only can it be used to bookmark information, but it also permits its user to highlight or add sticky notes to pages. Furthermore, it sports an impressive search capability, just as Google Notebook has done.
Fortunately, Zotero also allows users to drag and drop highlighted information directly into a note, eliminating the need to press a "clip" or "paste" button. For this reason, Zotero is an excellent program to use if you desire to put together a mailing list.
Download Zotero
Zotero is a free & handy piece of software that is easy to install. Equipped with a portable bookmarking tool, the Zotero application provides space for you to deposit information you discover on the internet. Doing so is easy. Once downloaded, Zotero's extension can be opened from the bottom corner of your screen (just like Google's soon defunct Notebook extension). Once opened, it will expand to fill a third of the screen.
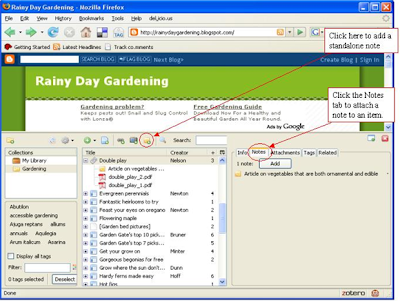
To get started with a new notebook, you will only need to press an icon titled "New Standalone Note" and begin to type into a blank page in the 3rd column of the Zotero pane. Next, highlight any information from the internet that is of particular interest to you, just as you would do if you were preparing to copy & paste it into a document . However, instead of needing to worry about opening up a Word document, you can simply drag the info directly into the notebook. Here, it can be modified, and can later be exported by being dragged outside of the notebook to a desired spot.
In addition to this convenient drag & drop feature, Zotero also permits users to simply record a page's URL, as well as record a screenshot of the page.
Research Your Prospects
Plenty of information exists online to suit the needs of a wide range of aspiring entrepreneurs. When useful email addresses are collected in one place, they can be worth a pretty penny. Instead of worrying about needing to purchase this information from data gathering experts, why not just gather it yourself?
Since Zotero's extension does not require repeated users to enter user IDs and passwords, it is an easy place to store useful information about potential business prospects. In fact, getting in and out of Zotero is even easier than logging onto the internet.
Open & Title a New Standalone Note
While Zotero permits you to tag items with the URL code from which they originate, the easiest way to save email addresses is to simply drop them one by one into a standalone note. Should you later have questions about the email address you've saved, you can always Google the email address in question and you'll most likely get a list of results that includes the site from which you extracted the address.
Conveniently, Zotero automatically saves your work, just as Google's Notebook & Google Docs does. This can be a lifesaver if you're called away by an instant message, by a co-worker, or by a family member.
Send Your Mail Via Gmail
I recommend Gmail over Hotmail because, of the two, Zotero proved to be more compatible with Gmail when I performed a side-by-side comparison. A chunk of email addresses can be pulled out of your Zotero notebook and dropped directly into the BCC line of an email. Although Standard Edition Google accounts permit users to send 500 emails per day to external recipients, Google itself recommends to users to bypass this restriction by creating multiple email accounts.
And this is the least of what Zotero can do. Although using Zotero takes a little work & ingenuity, it is a real lifesaver in the end. It frees up your energy to tackle complex projects without having to worry about getting overwhelmed.
Better Than Google Notebook?
Now it's time for the big question: Do you feel like Zotero is a worthy replacement to Google Notebook? Let us know if you've tried Zotero yet. If you have, how do you like it? Do you have any tips for others about how to make the most of Zotero?
How To Start A Blog That Gets Instant Traffic
Starting a new blog can feel like an overwhelming task. Not only does it involve either developing your own template (or finding a free one), creating interesting content that people will want to read, and making the blog SEO optimized, but once you're finished developing that amazing new blog, you need to somehow get people to start visiting.
With millions upon millions of websites on the Internet, and with potentially hundreds of thousands focused on the same subject or niche that you are – developing an audience can feel even more overwhelming than trying to start a blog from scratch in the first place.
I've been working on the Internet long before it became wildly popular in the 1990s, and in the process of watching the evolution of the Internet I've come to realize and appreciate something amazing about the current incarnation of the Internet, known as Web 2.0. That something is this; If you know the rules of the game, then it is possible to start a blog that gets instant traffic from day one – and maintains that traffic into the future. Today I'd like to share 3 powerful techniques you can use to accomplish this.
Tip #1 – Write Optimized Content The First Day You Start A Blog
Many people who start a blog do so because they love writing. That's one of the reasons I started several blogs (horribly neglected) of my own. The problem is that most writers enjoy writing for the love of the process – not for the purpose of "optimizing" the content for search engines. The process of optimizing makes writers feel stifled, non-creative and cheap. Sort of like not wanting to go to Wal-Mart to save money even though you know that things are a heck of a lot cheaper there.
Writers know that optimizing is important to gather search engine traffic, but they either really understand the rules – or they simply don't care. Optimizing can take years to learn how to do effectively. Many bloggers suffer low blog traffic because they believe if they simply write amazing content – people will love it so much they'll keep coming back for more. This may be true – but it'll take you years to accomplish, versus months if you use SEO effectively.
Abhijeet offered a fantastic list of SEO tools that you can use to come up with high-value keywords for your posts. One of those tools that I would highly recommend to all bloggers is the Google Adwords tool. Using this tool the right way, you'll be able to start writing your very first blog posts that target exactly what people are searching for online.
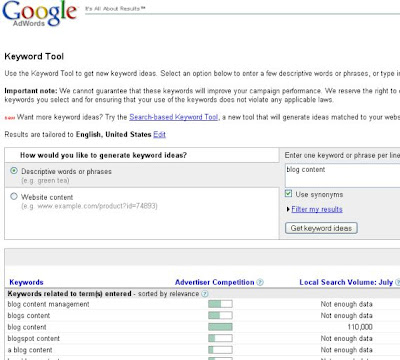
What's the "right way" to use Google Adwords? It's very simple, just brainstorm general topics that you want to write about and enter those, one at a time, into the "Descriptive words or phrases field." When you click "Get keyword ideas," you'll see a very long list of keywords and statistics appear at the bottom. Next, click on the blue column header "Global Monthly Search Volume" to sort the results by how many searches occur for each term every month.
If you find your keyword doesn't have a lot of traffic, scroll down to the section titled, "Additional Keywords to Consider."
Here's the basic SEO rule #1 that I'm going to share with MUO readers. Most bloggers see a keyword with very high search traffic and think, "oooh, a goldmine!" They then proceed to expend tremendous effort writing up a brilliant post using that phrase, only to end up on page 25 or 30 of Google results for that search term. Why? Because the secret of success when choosing keywords where your new blog (or even professional blog) can compete is choosing keywords with very low competition (that cool-looking blue bar graph on the left). Choosing keywords with very high search traffic each month and very low competition will bring traffic to your site the moment Google next crawls your blog. Speaking of which, did you take Karl's advice and submit your site to Bing and Google yet?
Tip #2 – Engage The Blogosphere Every Single Day
If you want to get a lot of traffic to your new blog from day one, you've got to give people who are interested in the topics you write about a good reason to visit your blog. One of the first things that I noticed when I started using Facebook is that it's human nature for people to check out your wall if you take the time to post on theirs. The same is very true about the world of blogging, but on a much larger scale.
When you post a thoughtful comment on someone else's blog, not only will the blogger probably check you out, but so will readers who like your comment. To do this effectively, you should use a tool like Ratingburner or Technorati to find the most popular blogs on the net within the niche that you write about.
Using Technorati to find similar blogs to my own blog FreeWritingCenter, I discovered one high-authority blog, AListApart, with fresh content just waiting to receive a good comment. You may need to sift down the list for blogs that are relevant to yours (I did).
Visit the other blogs, and if you aren't already a subscriber then become one. Your new blog will not take off unless you're ready and willing to engage the blogging community and contribute to other blogs as much as you want other people to contribute to yours. When you post a comment – don't do it without reading the post you're commenting on. Don't be one of those annoying spammers – you're trying to engage a community, not get free marketing for yourself.
The general rule of thumb here is to only post on blogs that allow you to include your URL, be positive and always compliment the blogger, and finally always reference one or two important points in the blogger's post – this proves that you actually read the article and found it interesting. A well written comment can go a very long way toward immediately attracting interested readers (and fellow bloggers) to your own blog.
Tip #3 – Becoming an Active Member of the Forum Community
The third most effective way to get instant traffic to your blog is to engage forum communities filled with folks who share an interest in the topic that your blog covers. Either generate a new thread, or comment on an existing thread that covers something you wrote about.
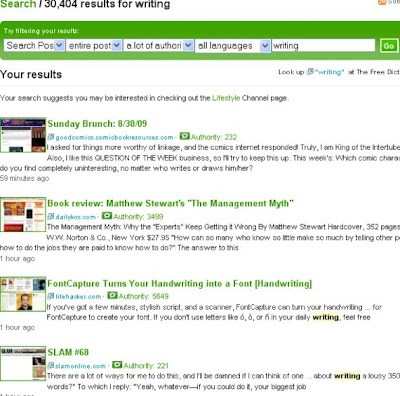
Finding a forum based on the topic of your blog is usually as simple as typing it into Google as something like, "writing forums." Although, I would highly recommend taking Darko's advice and useforum search engines which are often far more effective since they specifically target forums. Using BoardReader, I found a great webmaster forum post about writing at the V7 Network. When you register, don't forget to include your URL in your forum profile (most forums have a field for this).
Forum etiquette is to avoid posting your own URL in the very first few posts. Simply engage in a conversation with forum members. Once you prove to the forum administrators that your goal in engaging the forum community is to have a conversation and not just advertise yourself, they'll be far more willing to let you quote (and link) from your own blog every now and then. But the first step at any forum is just to get engaged in a quality conversation with other folks.
Forums can help in a lot of ways. Readers who find your comment interesting may click on your profile to check out who you are – and there, they'll find the URL to your blog. Additionally, many forums (such as the one above), allow you to post a link in your signature after you've made a certain number of forum posts. This assures the forum administrators that you're not only there to market yourself, and it eventually allows you to have a link back to your blog on every single post you make – which is a very powerful way to get a lot of traffic to your blog.
Forget about all of the silly instant marketing gimmicks that you find online from "SEO experts" that claim they can get you thousands of visitors a day. The unfortunate fact is that these are typically scams that use spamming techniques that'll get you penalized by Google in the end. The most effective way to "grow" your blog in a very organic and long-lasting way is to make sure all of your content is optimized, and then start spending an hour or so a day just engaging the online community that shares your interests.
Do you have your own unique techniques to draw instant traffic to a new blog? Share them with other MUO readers in the comments section below.
Two Easy Ways To Synchronize Zotero Data
Compared to the older generations, modern-day web-based writers are very lucky. Most of the tedious and time consuming research part of writing is now available from the comfort of the keyboard. We just type our queries and the hordes of results will appear before our screen.
But research is more than just collecting data. It's also about compiling and presenting the results. Many MakeUseOf readers have pointed out that for formal writing like academic writing, the Zotero research tool IS the unquestionable ultimate tool.
More Stable Versus More Features
Zotero research is a Firefox plugin designed to help people with their web research. It's been mentioned several times before.
The main page of the Zotero site has a short video tutorial which explains virtually everything that one needs to know about using the Zotero research tool. First time users should watch the tutorial to get acquainted with this research tool.
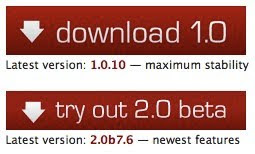
Currently, there are two versions of Zotero available. There's the latest stable version 1.0.10 and there's beta version 2.0b7.6 with more features. If you consider yourself a play-it-safe kind of person, you should stick with the stable. Otherwise, choose the beta.
There's a slight possibility of data loss in the beta version due to the still ongoing development of the synchronization feature. But with a good backup routine, this minor flaw should pose no threat at all.
Those who are willing to take the risk will be rewarded with many new features such as synchronization ability, compatibility with more word processors, and more collaboration options. The complete features list can be found here along with plugins to make the Zotero word processor friendly.
Synchronizing Zotero's Research Data
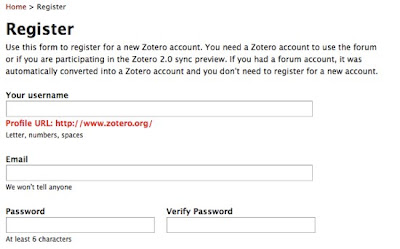
As mentioned above, if you are one of the Zotero v. 2 beta testers, you can enjoy the synchronization feature. But to use the feature, you need to register for a new Zotero account.
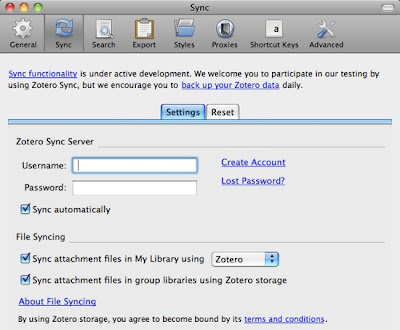
After the usual process of registering, you can start using the feature by attaching your Zotero installation to the account. Open Zotero by clicking the logo at the bottom right of your browser, or by using the default shortcut: Command + Shift + Z.
Then open Zotero Preferences and click Sync > Settings. Put down your account information there.
If you are working with several computers, you have to insert your account information to each Zotero installation in every computer.
Enhancing Zotero With Dropbox
The above method only works for v.2 users. There's another way to synchronize your Zotero data between computers that can be used by both v.1 and v.2 users: using help from Dropbox.
Zotero puts its data in a folder. By default, this folder is inside the Firefox Profile directory and is accessible only by Firefox.
Dropbox users can utilize this free service to sync and backup Zotero data using the method similar to the one described in this article. Basically, all you need to do is move the data folder to a location inside Dropbox folder and set Zotero installations in another computers to use that specific Dropbox folder to store the data.
Pointing Zotero data storage to a different location can be done from the Preference window. Go to the Advanced pane and click "Choose" under the "Data Directory Location". Browse and open the new location (the folder inside Dropbox folder).
Aside from the compatibility with v.1 and the automatic synchronizations and backups, using independent location to store Zotero data has another benefit. The data is also available to be used by another browser: Flock.
Flock is compatible with all of Firefox extensions. Meaning: you can also install Zotero under Flock. Independent location means that the data can be accessed simultaneously by Firefox and Flock. This is good news for all of you Flock lovers out there.
I've just started using the Zotero research tool, so there are still many things to learn. Veteran Zotero users, share your tips, comments and opinions in the comments below.
Label:
computer,
dropbox,
Internet,
web hosting,
zotero
5 Cool Apps That Make Dropbox Even More Useful
Dropbox, if you don't know about it yet, is an excellent synchronization tool. In fact it is one of our favorite tools to sync and backup files and other important data. Dropbox can seamlessly sync your files across multiple computers and also provides features like shared and public folders allowing you to share/sync only the content you want to be synced with the other computer.
Out of the box Dropbox works really well with support for Windows, Mac and Linux. The default functionality, however leaves a lot to be desired. For instance you can only sync files and folders that are contained within the My Dropbox folder.
Here we present some useful dropbox downloads – software tools and applications that you can use alongside Dropbox to make it even more useful. Some of them fill the voids left by the out of box functionality while some of them take Dropbox to a whole new level, using it for things far beyond synchronization.
Junction, SyncToy, Conduit
All of these Dropbox downloads fall in roughly the same category. They help you keep two folders in sync. So why would you need any one of these when you are already using Dropbox? Well, because you can use them to sync folders via Dropbox that are outside the My Dropbox folder for your account.
While all of these applications are fantastic, I must point out that you can use the mklink command on Windows and the ln command on Linux to create links to external folders from within the My Dropbox folder
Dropbox Portable / Dropbox U3
Both these Dropbox application downloads or add-ons serve the same purpose. They let you install and use Dropbox from your USB flash drive. Dropbox U3 is specially made for U3 Smart flash drives.
All you need to do is to unzip or install onto your Flash drive and you are set to use Dropbox with your flash drive. So now you can keep your pen drive data synced and backed up to the cloud easily!
MailDrop
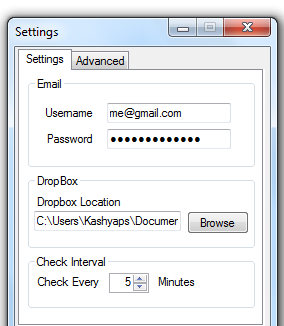
MailDrop is one of my personal favorites. It lets you add files to your Dropbox using nothing but email. Here is how it works: it checks your mail account via IMAP. Any mail inside the Dropbox folder (label in Gmail speak) is checked for attachments and those attachments are uploaded to your Dropbox.
You will of course be required to provide your mail credentials so that MailDrop can access your account via IMAP. MailDrop's developer says that the email credentials are only used locally by MailDrop and you need not provide your Dropbox credentials.
Dropbox Copy Plugin
The Copy Plugin lets you copy or move files to your Dropbox folder via the right click context menu. It then copies the Dropbox public link on to the clipboard so you can share in a snap.
Akira
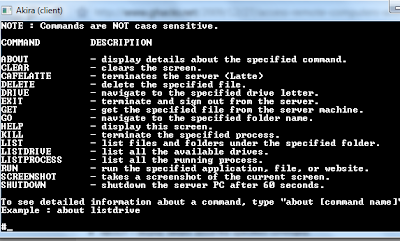
The Akira Dropbox download can let you control certain aspects of a remote machine via commands using nothing but Dropbox as the conduit. You can do tasks like running an application or shutting down the remote computer using Akira. While it cannot replace remote desktop or ssh login into a Linux machine, Akira provides a good basic set of commands that are pretty useful and easy to remember and use at the same time.
MakeUseOf has written a lot about Dropbox in the past. Here's a small selection :
3 Reasons Why Students Should Be Using Dropbox
How To Run Multiple Dropbox Accounts Simultaneously [Mac]
4 Unique and Cool Ways To Use Dropbox
How To Run Multiple Dropbox Accounts Simultaneously [Mac]
4 Unique and Cool Ways To Use Dropbox
Do you use any other Dropbox downloads or custom scripts to make Dropbox even more useful? Let us know about them in comments!
Label:
dropbox,
Internet,
online Backup,
web hosting
Selasa, 20 April 2010
PyDropboxPath Changes the Name of Your Dropbox Folder
Windows/Mac/Linux: Dropbox lets you change the location of your automatic syncing folder, but doesn't let you change the name. For those hoping for aharmonious dual-boot system, or just fine-grained control, that's problematic. A tiny little app saves the day.
We've previously detailed how to sync folders outside your Dropbox folder before, using symbolic links to pull them in as sub-folders. And for most purposes, that works fine. But if you're dual-booting a Windows/Linux system, or even Windows/Mac, you might notice that Dropbox names its folder just "Dropbox" on Mac and Linux, but "My Dropbox" on Windows. That means supporting two different sync folders on one computer, which, especially for larger paid accounts, can mean quite the hard drive commitment. Then again, you might also just want to give your Dropbox folder a personal touch, like naming it "Instant Backup" for friends who aren't tech savvy, but do need some basic backup. You can even set up Dropbox to sync to a removable thumb or USB drive, if that's your thing, though that's not exactly foolproof syncing.
pyDropboxPath is a Python script, also packaged up as an easy-to-run Windows .exe app, that locates your Dropbox database file and changes where it looks for synced files. You need to shut down Dropbox before running it, and some Windows users may get an error message about a missing DLL file—but those DLL files are helpfully included at the author's public Dropbox page. Instructions on running the Python scripts from Mac and Linux systems is included at the Readme-First page.
pyDropboxPath is a free download, and should work wherever Python does.
pyDropboxPath [Dropbox Forums]
Minggu, 18 April 2010
Export Outlook Contacts to Google Gmail
Export Outlook Contacts
- In Outlook, on the File menu, click Import and Export.
- Click Export to a file, and then click Next.
- Click Comma Separated Values (Windows), and then click Next.
- In the folder list, click the Contacts folder, and then click Next.
- Browse to the folder where you want to save the contacts as a .csv file.
- Type a name for the exported file, and then click OK.
- Click Next.
- Click Finish.
Import Contacts into Google Gmail
- Log on to Gmail, and then click Contacts at the top of the page.
The Contacts list opens in a new window.
- Click Import Contacts.
- Click Browse, and then navigate to the .csv file that you created in the "Export Outlook Contacts" section of this article.
- Select the file, and then click Import Contacts.
Notes
- Outlook Contacts without an e-mail address are not imported.
- Outlook distribution lists are not imported. Gmail does not support distribution lists.
- If an Outlook Contact that matches an existing Gmail contact is imported, your Outlook Contact information replaces the Gmail contact.
How To Share The Internet Connection Between Mac and PC
Here's the scenario that brought me to write this article: the ISP I've signed up with decided to temporarily block the internet connectivity in our area. Where I live, it's actually possible — things like these do happen without reason. Because of that, Mark O'Neill suggested purchasing a UMTS device that would allow me to go online just about anywhere with reception. So I did. It costed me quite a bit but I thought it would be worth the money.
Now, here's the tricky part. In my home network, we have 2 Macs and one PC running on Windows XP. The UMTS device connects via USB. How do we decide who gets to use it? We put our thinking caps on and finally decided that it would be easier to share the internet connection using one of the Macs. I rolled up my sleeves and got to work.
Internet sharing between Macs is basically very easy but if you add a Windows PC into the mix, things get a little problematic. Sharing the internet connection between Mac and PC turned out to be harder than I thought. I'll explain why in a minute. But first, let's just assume that we only needed to share the connection between 2 (or more) Macs via AirPort (WiFi). It's very simple.
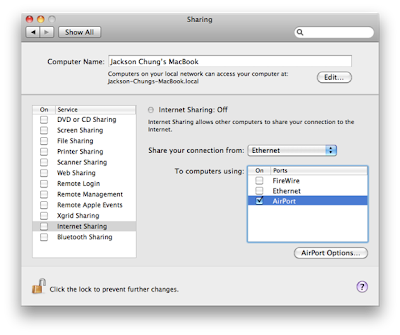
Open System Preferences and click on Sharing.
Before Internet Sharing can be enabled, you first have to configure the proper settings.
In the 'Share your connection from' dropdown list, select the port that has internet connectivity. In the screenshot above, I have "Ethernet" selected when it actually should be USB — ignore that. Then select how you would like to share the connectivity. I chose AirPort so that I can share the connection with several other computers. Checking the box next to 'AirPort' unbricks the 'Airport options' button.
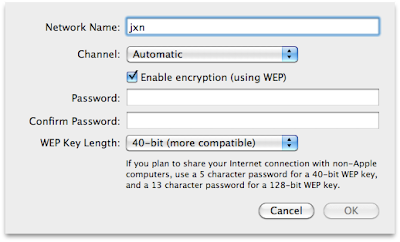
Click on that button and configure your network name and security options.
Alright, here's where the whole Windows and Mac concoction starts to rear its ugly head. Due to the different methods that the two operating systems deals with Hex encryption, the password you enter here will not be easily accepted by Windows. A Windows PC will be able to detect the wireless network but it will not be able to join.
Here's the workaround. Select the 128-bit WEP encryption option and enter a 13-character password. Then, rename the network to something really short without spaces. When you're done, hit OK.
Now you can check the box next to 'Internet Sharing'. You may get a prompt to start AirPort, click Start. Right, the connection is shared. Macs detect the network automatically (and so will iPhones and iPod touches) and will connect to it as though it's a regular router.
On the Windows PC, a little bit of manipulation is required. Turn on the wireless adapter and right-click on its taskbar icon to select "View available wireless networks". In the subsequent window, click on "Change advanced settings".
Click on the Wireless Networks tab and then click the 'Add' button to add our shared network.
Print the network name accurately, then set the network authentication to 'Shared', data encryption to 'WEP', uncheck the box next to "This key is provided for me automatically" and enter the 13-character password.
Click on the Authentication tab and disable IEEE 802.1x authentication. Next, click on the Connection tab and make sure that it will connect when in range. Click OK and apply the settings.
It should now try to connect to the shared AirPort connection. Cross your fingers. This sort of busts the myth that Macs and Windows won't work well together, doesn't it?
I noted a few oddities during the whole procedure: 40-bit WEP encryption didn't work when trying to share the internet connection between Macs and PC. The password was always incorrect. Then I changed it to 128-bit and everything was well. Also, the network name must not contain any spaces. The Windows PC wouldn't connect to "Jackson Chung's MacBook" but it connected with "jxn".
How would you go about this procedure from a Window's point of view? I would love to hear it. Tell me how — in the comments!
Kamis, 15 April 2010
How To Run Multiple Dropbox Accounts Simultaneously [Mac]
One of the most useful computer applications that I've come across so far is Dropbox. There are already countless articlesabout this automatic folder backup and synchronization tool here in MakeUseOf, including many usage spin-offs like:synchronizing research data and triggering automatic downloads.But if you are an avid Dropbox user, there might be times when you wish you could run multiple Dropbox accounts simultaneously.Maybe because you need to seperate personal account and work account, or maybe you just want to get some extra storage – for free. Whatever the reason is, there are ways to run multiple Dropbox accounts at once. Here are the steps to do it on a Mac.
Before you start, you need to create an additional account with Dropbox.Command Line Galore
Tweaking Dropbox to enable multiple instances requires meddling with Terminal and a whole bunch of command lines. I'm not a fan of command line myself, but I can tell you that the following process is not as "scary" as it sounds.There are two steps that need to be taken. The first step is setting up the account.
- Open Terminal
- Type (or just copy and paste) this command:
bashHit enter and insert the next command line:HOME=$HOME/.dropbox-alt /Applications/Dropbox.app/Contents/MacOS/Dropbox &Here's how it looks like.- A new Dropbox icon will appear in the menubar.
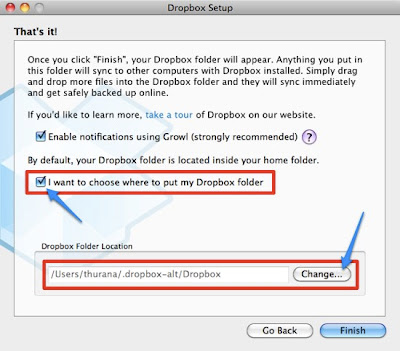
- A Dropbox account setup window will also pop up. Follow the setup steps.
- At the last setup step, tick the option to choose your own location of Dropbox folder. Hit the "Change" button to determine the location.
- After the setup process complete, you can close the terminal. Theoretically, the extra Dropbox instances will also be closed, but in my experiment it remained in the menubar.
That's the end of step 1. We'll go to the second step: creating the startup item for the extra Dropbox instance.
- Open the Terminal (again)
- Paste in this command line:
mkdir -p ~/wherever you like/DropboxAltStarter.app/Contents/MacOS/In place of "wherever you like" really does mean anywhere on your hard drive that you like, such as ~/Documents/.In this step, you are creating an application called "DropboxAltStarter". But it's not completed yet.- Then open TextEdit and paste:
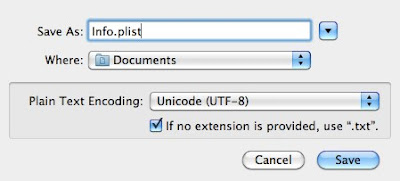
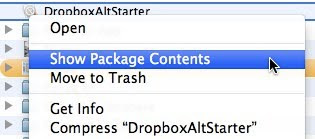
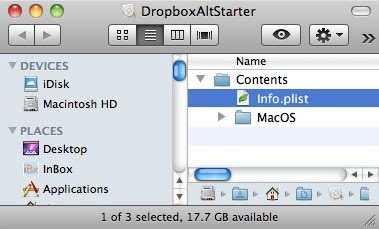
<?xml version="1.0" encoding="UTF-8"?> <!DOCTYPE plist PUBLIC "-//Apple//DTD PLIST 1.0//EN" "http://www.apple.com/DTDs/PropertyList-1.0.dtd"> <plist version="1.0"> <dict> <key>CFBundlePackageType</key> <string>APPL</string> <key>CFBundleExecutable</key> <string>DropboxAltStarter</string> <key>LSUIElement</key> <string>1</string> </dict> </plist>Save the file as: "Info.plist" anywhere.(Please note that the <!DOCTYPE plist PUBLIC "-//Apple//DTD PLIST 1.0//EN" and"http://www.apple.com/DTDs/PropertyList-1.0.dtd"> above should be written within one line of code – separated by a space, but we need to break it down into two because it couldn't fit into the WP theme. So don't forget to enter it in one line).- Right click on the "DropboxAltStarter" that you've created before and choose "Show Package Contents"
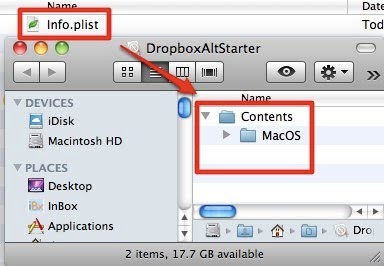
- Drag and drop the "Info.plist" file into the folder "Contents" (the same level as "MacOS" folder).
- Create a new text file and paste:
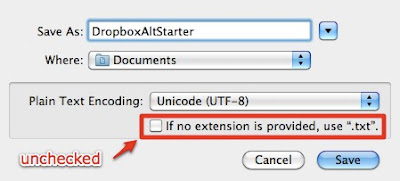
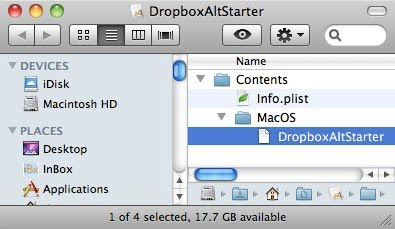
#!/bin/bash HOME=/Users/$USER/.dropbox-alt /Applications/Dropbox.app/Contents/MacOS/Dropbox(Again, the HOME=/Users/$USER/.dropbox-alt and/Applications/Dropbox.app/Contents/MacOS/Dropbox should be written in one line of code separated by a space. You know what to do.)Then save the file as "DropboxAltStarter" (sans quote). Don't forget to uncheck the "If no extension is provided, use ".txt"" box to prevent TextEdit from saving the file as text file.- Repeat steps 4 and 5 above to put the "DropboxAltStarter" file into the "MacOS" folder.
- Open Terminal and type this command:
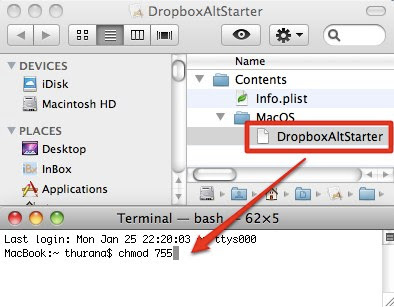
chmod 755Before you hit enter, drag and drop the "DropboxAltStarter" file to the Terminal to finish the command.Then hit enter.- Now you have a working app. You can move it to the "Applications" folder if you like, double click it to open the second dropbox account.
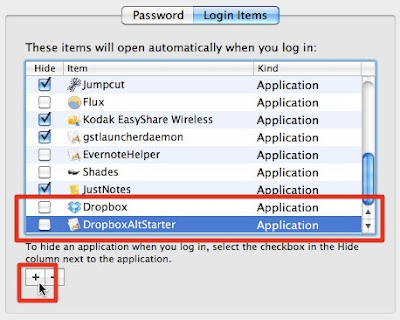
- You can also add the newly created app to your start up list by going to "System Preferences > Accounts > Login Items" menu.
After the long journey
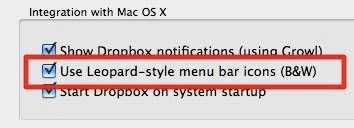
Whew! That was quite a long ride, wasn't it?The work is done, but there's still one thing to add: To know which Dropbox account is which, you can assign different logo to one of them. Go to Dropbox' "Preferences > General" and choose the B&W logo for one of the accounts.If you are a Windows user, you can use Dropbox addon called Dropboxen to achieve the same result.So, what would you do with two Dropbox instances? Do you know the way to run multiple Dropbox accounts? Share your thoughts and opinion using the comment below.
Langganan:
Postingan (Atom)

