Halaman

Kamis, 28 Oktober 2010

Smart EVDO internet akses

Jangkauan (coverage area) Smart EVDO per tanggal 17 Juli 2010

CONTENTS

  1. Jakarta Pusat
  2. Jakarta Barat
  3. Jakarta Utara
  4. Jakarta Timur
  5. Jakarta Selatan
  6. Bandung
  7. Semarang
  8. Jogjakarta
  9. Solo
  10. Surabaya
  11. Bali
  12. Malang


Jakarta Pusat
Gambir
Tugu Tani
Kebon Sirih
MH Thamrin
Menteng
Cikini
Pegangsaan
Salemba
Kramat
Johar Baru
Senen
Cempaka Putih
Pasar Baru
Gunung Sahari
Harmoni
Petojo
Cideng
Kampung Bali
Kebon Kacang
Kebon Melati


Jakarta Barat
Pal Merah
Kelapa Dua
Pos Pengumben
Daun Sulaiman
Kebayoran Baru
Letjen Soepono
Palmerah Barat
Permata Hijau
Tentara Pelajar
Letjen S Parman
Pejompongan
Gerbang Pemuda
Asia Afrika
Sudirman
Pintu 1 Senayan
Sisingamangaraja
Pattimura
Senopati
Kapt Tendean
Mega Kuningan
Gatot Subroto
Supomo
Tebet
Asem Baris
Abdul Syafie
Dr Saharjo
Manggarai
Sultan Agung
Casablanca
Rasuna Said
Jend Sudirman
Rm Margono
KH Mansyur
Benhil
Joglo
Meruya
Puri Indah
Kembangan
Daan Mogot
Kebon Jeruk
Tegal Alur
Kamal
Citra Garden 5
Citra Garden 3
Citra Garden 2 Ext
Peta Utara
Komp Merpati (MNA)
Puri Gardena 1
Puri Gardena 2
Peta Barat
Citra Garden 1
Peta Selatan
Kalideres Permai
Daan Mogot Baru
Citra Garden 2
Citra Garden
Taman Surya 5
Taman Surya 3
Taman Palem Lestari
Komp Pemda
Kavling Pemda
Kavling PTB
Taman Kencana
Kamal Raya
Komp KFT
Cengkareng
Cengkareng Barat
Kapuk
Mutiara Taman Palem
Perumnas Bumi Cengkareng Indah
Cengkareng Timur
Cengkareng Indah
Ciledug


Jakarta Utara
Bekasi Raya
Pegangsaan Dua
Musik Raya
Bulevar Timur
Kelapa Kopyor Raya
Kelapa Nias Raya
Kelapa Hibrid gading
Vila Sanur
Vila Tampang siring
Vila Kuta
Vila Kintani
Gading Raya
Bogor Bulevar
Bulevar Barat
Kelapa Gading
Letjeb Suprapyo
Sunter Jaya
Sunter Jaya Barat
Mitra Sunter Bulevar
Sunter Jaya Barat
Ledondong Raya
Sunter Raya
Danau Sunter Selatan
Danau Sunter Utara
Tol Pelabuhan
Sunter Permai Raya
Danau Sunter Barat
Pantai Indah Kapuk
Pluit


Jakarta Timur
Pulo Mas
Pulo Gadung
Pulo Asem Utara
Taruna
Cipinang jaya
Bekasi Timur Raya
Bojana Tirta
Cipinang Baru
Duren Sawit Raya
Buaran Raya
Perumnas Raya
Delima Raya
Wijata Kusuma
Teratai Putih Raya
Pondok Kopi
Cilincing
Sentra Primer Timur
Pulo Gebang penggilingan
Penggilingan Elok
Condet
Kramat Jati
Kp Rambutan
Cijantung
Ciacas
Cipayung
Pondok Gede
Bekasi
Lubang Buaya
Kampung Melayu Besar
Balimester
Otto Iskandar
Dewi Sartika
Jend Sutoyo
Jengki
Halim Peradana Kussuma
Trikora
Kali Malang
Kebon Nanas
Media Massa
Pahlawan revolusi
Jend R S Soekanto
Pondok Kelapa Raya
Kali Malang
Jati Waringin
Angrah
Jati Bening
Curug


Jakarta Selatan
Kebayoran Lama
Kebayoran Baru
Mampang
Cipete Utara
Cilandak
LB Bulus
Kebayoran Lama
Kebayoran Baru
Senayan
Jend Gatot Subroto
Rasuna Said
Kapten Tandean
Mampang Prapatan
Tegal Parang Utara
Tegal Parang Selatan
Pasar Minggu Raya
Pahlawan Kalibata
Letjen MT

Access Your Free Yahoo! Mail via MacFreePOPs

Using Apple Mail for Yahoo! users can be a stumper. Previously it could only be used by Yahoo! Mail Plus accounts, and not the free Yahoo! Mail accounts. But thanks to the free MacFreePOP service, you can now configure the Mail app to fetch, send out, and handle all of your Yahoo! mail.

/Users/Chet/Downloads/MacFreePOPs instruction/mailappThere’s no direct way to use Apple’s Mail app for your free Yahoo! Mail. You’d need a paid Yahoo! Mail Plus account to get through that “Create New Account” screen. Sure, you can sign up with Gmail (it’s free), and that’s a good alternative, or have a MobileMe account (free for 60 days), but if you REALLY want that free Yahoo! Mail account because you’ve wrapped your whole entire digital life on it, I've got your back! Luckily, there is a way to POP your way for cheapskates and stubborn Yahoo users like I.

Just like a recipe, you’ll need the following:

  • A free Gmail account
  • A free Yahoo! Mail account
  • MacFreePOPs
  • A Terminal code

Don’t be daunted. Following this guide should help you get through.

First off, sign up for a Gmail account if you don’t already have one. For those who want to avoid having multiple accounts, we can set Gmail to auto-forward whatever it receives to your Yahoo! email account, which will be discussed more later.

We need the Gmail account to be able to send outgoing mails. Unfortunately, our free Yahoo! Mail accounts won’t allow us to send mail out using Apple's Mail program.

I’m sure you already have a free Yahoo! Mail. That’s why you’re reading this article! We'll need the login details for your Yahoo! account to set up the account in Apple’s Mail.

Download, install, and update MacFreePOPs. The link can be found via Apple’s downloads section. It will handle forwarding your emails from Yahoo! to your Apple Mail.

Kamis, 21 Oktober 2010

How To: Dual Boot Mac OS X Snow Leopard and Windows 7 on a PC

Geeks love Macs because Macs are really cool. They are slick, stylish and freaking awesome! What about windows 7, by the way? Yea, it is also cool, slick, stylish, bug free and freaking awesome! Being a hardcore geek, what will you go for? A Mac with Snow Leopard or a PC with Windows 7? Not sure? Why not go for both of them?

Oh! Don’t have the money to afford both? Don’t worry! TheGadgets.net is here to help you out! You won’t even need to buy a Mac! Lo! This step by step guide will help you install Mac OS X Snow Leopard as well as Windows 7 on a single PC! You don’t even need a high end PC! Just your current computer will work!

Step by Step Guide to Dual Boot Mac OS X Snow Leopard and Windows 7 on a PC:

Note: You need to follow the steps in the given hierarchy. Performing them out of order will not work.

1. Backup your data:

The first and the most important thing is to backup your data. It is not optional at all because you need to format and partition your hard disk from scratch. Best option is to write the important files to a DVD ROM so that you are able to access them anytime, anywhere.

Tip: DVD ROMs work even in worst conditions when USB and network ports may fail.

Selasa, 19 Oktober 2010

Setting Blackberry as a Modem

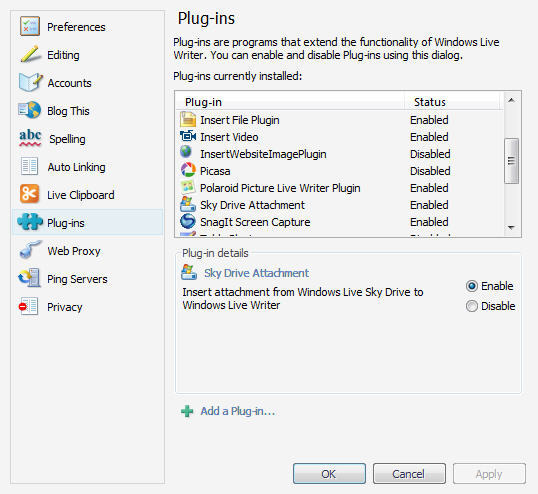
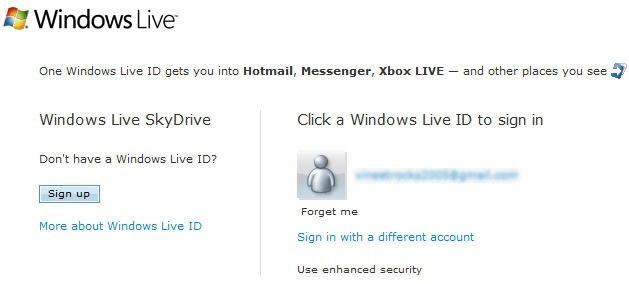
Currently, Blackberry users can enjoy the Internet through mobile phones is the way makes it as a modem. So if the browser view that there is a shortcoming of the phone, your blackberry with the facilities that function as a modem this can we do. Here are some steps to set the settings.


1. Make sure Desktop Manager Applications is installed on your PC or laptop, while the version that can be used at least the version of Desktop Manager. Usually when you buy the CD package Blackberry included in it, so you can directly use it.

2. Blackberry handset and connect with a PC using the USB cable. Open the Desktop Manager application, because the Blackberry handset can be used as a modem when the Desktop Manager application is active.

3. Make sure the modem driver to function properly. The setting is done click Start-Settings-Control Panel-Phone and Modem Options. On the Modems tab will be visible to the new Standard Modem on a new port. Then click properties-Diagnostics-Query Modem.

4. Then click Advanced, and then fill with the Extra initialization.

5. After the extra setting is finished, close the window and then Phone and Modem Options. Create a new connection, with a click Start-Settings-Network Connection-Right click-open, and then create a New Connection, click next.

6. Select “Connect to the Internet”, click next

7. Select “Set up my connection manually” click next

8. Select “Connect using a dial-up modem”, click next

9. Marked on the Standard Modem, name connection “Blackberry Modem”, then click Next.

10. Follow the next command to complete.

Sabtu, 16 Oktober 2010

Mengubah Password MySQL

Instalasi awal MySQL itu username adalah root, dan tanpa password

Untuk mengubah ke password tersendiri, Anda bs menggunakan MySQL Administratos, bisa di download disini. Kemudian ikuti petunjuk empat petunjuk visual di bawah ini… Gift with a bow


Dilbert-1993-11-01

Dilbert-1993-11-02

Dilbert-1993-11-03

Dilbert-1993-11-04

Semoga bermanfaat!

Sabtu, 09 Oktober 2010

Bagaimana bikin listrik di rumah pakai solar panel.


http://www.flickr.com/photos/chandramarsono/2283251419/

Menggunakan listrik dari tenaga surya di rumah? Wah menarik juga, tapi bukankah itu solusi yang mahal? Kan, PLN sudah menyediakan listrik yang lumayan murah. Lalu apa untungnya buat saya kalau menggunakan listrik ‘buatan sendiri'?


Semua tergantung dari kebutuhan yakni digunakan untuk apa PLTS ( pembangkit listrik tenaga surya ) yang kita pasang. Jika untuk mengcover seluruh peralatan rumah tangga pada umumnya saat ini, memang masih dapat dibilang kurang terjangkau dan sesuai.

Saat ini untuk menggunakan PLTS, perlu dibuatkan skala prioritas terlebih dulu. Dan berikut beberapa pertanyaan mendasarnya.

  1. Dimanakah saya tinggal ? Jika tidak ada atau akses PLNnya kurang baik (listrik PLN sering mati), PLTS bisa menjadi salah satu solusi sebagai sumber energi.

  2. Nah, bagaimana jika akses PLNnya sudah baik? Tentunya, untuk biaya jangka pendek, penggunaan PLN masih lebih murah sehingga jika kalkulasi biaya sebagai tujuan untuk mendapatkan yang lebih "murah", nampaknya PLTS masih belum dapat menjadi solusi karena PLTS masih bersifat investasi dimana membeli listrik beberapa tahun ke depan untuk dikonsumsi saat ini.

Apa keuntungan menggunakan listrik dengan solar panel?

  • Mengurangi biaya listrik jangka panjang (inget loh, kita kan pakai listrik seumur hidup!)
  • Mengurangi ketergantungan pada listrik dari batubara (horeee...emisi karbon saya turun!)
  • Menghindari dampak pemadaman saat harus mengejar deadline, sementara komputer tidak bisa dinyalakan :-)
  • Sedikit pamer ke teman-teman kita bahwa kita sudah bergabung dengan komunitas pengguna solar panel sedunia! (huhuuuyy..! Cool)
  • Turut mengurangi pemanasan global karena sistem solarpanel menghasilkan energi yang ramah lingkungan yang tidak menyebabkan polusi.

Hmmm... tapi kenapa pakai solar panel sih?

Mayoritas listrik yang digunakan di Indonesia berasal dari pembangkit listrik dengan bahan baku batubara. Masalahnya, dari proses ini dikeluarkan banyak emisi karbon yang merupakan sumber terbesar penyebab terjadinya pemanasan global (global warming).

Sementara, permintaan kita untuk listrik makin hari makin besar. Coba lihat berapa alat di rumah kita yang tidak bisa berjalan tanpa listrik, dari DVD hingga kulkas. Belum lagi penggunaan listrik yang boros. Akibatnya, pembangkit listrik kita tidak mampu lagi untuk memberikan listrik sebesar permintaannya. Makanya pemadaman makin sering terjadi.

Di sisi lain, kita kan tinggal di negara yang kaya akan cahaya matahari yang dibuktikan secara geografis letak Indonesia di Garis Khatulistiwa sekaligus sebagai Negara Tropis. Kenapa gak kita maksimalkan saja penggunaan cahaya matahari yang diberikan gratis oleh Tuhan?

Sistem solar panel

OK, saya berminat dengan solar panel... lalu, bagaimana dengan biaya pemasangannya?

1Kita mulai dengan perhitungan dulu. Berapakah kebutuhan jumlah total beban di rumah yang akan menggunakan tenaga dari solar panel? Dari tagihan listrik, bisa dilihat tingkat konsumsinya dalam bentuk kWh (kilowatt per jam) setiap bulan misalnya. Nah dari situ kita bisa identifikasikan berapa kWh yang dibutuhkan tiap hari, misalnya 200 watt.

2Pertanyaan selanjutnya adalah : Berapa lama beban yang totalnya 200 watt ini akan dihidupkan dengan menggunakan sistem solar panel ? Boleh kita ambil misalnya 12 jam. Jika 12 jam, berarti total konsumsi daya beban dalam sehari adalah 12 x 200 kWh = 2.400 watt.

3Tentunya lebih diuntungkan jika beban yang menggunakan solar panel dinyalakan pada siang hari. Dengan begini, penggunaan baterai relatif tidak berat dan dimungkinkan jumlah baterai dapat pula dikurangi jumlahnya, karena listrik yang disupply tidak hanya oleh baterai tetapi sinar matahari masih turut memberikan supply.

Mari kita ambil contoh penggunaan sistem solar panel adalah pada pukul 18.00 s/d 06.00 (12 jam).

4Nah, sekarang kita hitung berapa besar dan jumlah baterai yang dibutuhkan untuk mensupply beban sejumlah total 2.400 watt:

Jumlah total 2.400 watt perlu ditambahkan sekitar 20% yang adalah listrik yang digunakan oleh perangkat selain panel surya, yakni inverter sebagai pengubah arus DC (searah) menjadi AC (bolak - balik) (karena pada umumnya peralatan rumah tangga menggunakan arus AC), dan controller (sebagai pengatur arus) yakni menutup arus ke baterai jika tegangan sudah berlebih di baterai dan memberhentikan pengambilan arus dari baterai jika baterai sudah hampir kosong.

Sehingga jika ditambahkan 20%, maka total daya yang dibutuhkan adalah 2.400 x (2.400 x 20%) = 2.880 watt.

5Dari 2.880 watt tersebut, jika dibagi 12 V ( tegangan umum yang dimiliki baterai) maka kuat arus yang dibutuhkan adalah 240 Ampere. Maka, jika kita menggunakan baterai yang sebesar 65 Ah 12 V, maka kita membutuhkan 4 baterai (65 x 12 x 4 = 3.120 watt).

6Dengan mendapatkan 3.120 watt ini, kita akan mendapatkan jumlah panel yang kita butuhkan, termasuk besarannya yakni sebagai berikut. Jika menggunakan ukuran panel yang 100 wp (watt peak), maka dalam sehari panel ini kurang lebih menghasilkan supply sebesar 100wp x 5 (jam) = 500 watt.

Adapun 5 jam didapat dari efektivitas rata-rata waktu sinar matahari bersinar di negara tropis seperti Indonesia, dan 5 jam ini sudah menjadi semacam perhitungan rumus baku efektivitas sinar matahari yang diserap oleh panel surya. Maka jika 1 panel yang 100 wp mampu memberikan listrik sejumlah 500 watt, didapatkan total panel yang dibutuhkan adalah sejumlah 3.120 watt / 500 watt = 7 panel (baiknya kita lebihkan).

7Nah, kita sekarang sudah berhasil mendapatkan kombinasi antara jumlah panel surya dan baterai untuk mensupply listrik sejumlah total 3.120 watt yang dinyalakan selama 12 jam sehari dimana beban yang menggunakannya dinyalakan pada malam hari antara pukul 18.00 s/d 06.00 yakni : 7 PANEL SURYA YANG 100 WP DAN 4 BUAH BATERAI 65Ah 12 V.
  

Perihal harga, saat ini sistem ini (sudah berikut seluruh perangkatnya) adalah berkisar US$ 9 -10 per wattnya. Jadi jika menggunakan 7 panel yang 100 wp (sehingga totalnya = 7 x 100 wp), maka estimasi biaya kurang lebih 700 watt x US$ 10 = US$ 7,000.


Jumat, 24 September 2010

Smart EVDO Internet Unlimited

smart evdo internet unlimitedKoneksi internet Smart EVDO Rev A Unlimited kecepatan paket Silver 512 kbps, Platinum 3.1 Mbps, Ultimate 3.1 mbps/1.8 mbps. Jangkauan Jakarta Bandung Semarang Jogjakarta Solo Surabaya Bali Malang.

Saya heran dengan Smart EVDO. Dulu awal-awal promo gaungnya heboh sekali. Dalam waktu singkat jangkauannya sudah meliputi seluruh Jakarta. Bahkan sudah sampai Surabaya dan Malang kota sekitar 4 bulan lalu.

Saya sampai datang ke markas Smart di Jalan Coklat, Malang, kapan sih Smart EVDO sampai ke kampung saya yang berjarak sekitar 25 km dari kota. CS-nya belum tahu. Dan ternyata sampai sekarang masih adem ayem saja.  Semangat mau pakai Smart EVDO jadi agak kendor.

Tempo hari saya cukup senang dengan berita adanya koneksi internet unlimited berteknologi serupa bernama AHA EVDO dari BConnect (Bakrie Telkom). Namun ternyata, unlimited-nya tidak murni. Kecepatan 3.1 Mbps itu dengan catatan quota 3 GB. Setelah pemakaian mencapai 3 GB, maka kecepatan akan melorot tajam ke 200 Kbps. Sungguh kejatuhan yang tidak mengenakkan. Ibaratnya, AHA EVDO memanjakan kita dengan naik BMW dua hari, terus harus naik sepeda kebo pada 28 hari berikutnya.

Berbeda dengan Smart EVDO. Kecepatan 3.1 Mbps adalah tanpa quota. Jadi, kecepatan tidak turun-turun.

Akhirnya saya memutuskan untuk tidak memakai AHA EVDO Internet. Dan dengan sabar menunggu datangnya koneksi Smart EVDO Internet Unlimited ke kampung saya. Untuk sementara saya pasrah pakai Speedy yang kabel telponnya suka dicuri maling.

Berikut Tarif Smart EVDO (Paket Silver, Platinum, Ultimate) Harga Eceran (Harian, Mingguan) dan Bulanan

Paket Internet Unlimited

Maksimum Kecepatan Paket Harga Per Paket
Nama Paket Kecepatan Download
(sampai dengan)
Kecepatan Upload
(sampai dengan)
Harian Mingguan
Silver512 Kbps128 Kbps5.00025.000
Platinum3,1 Mbps384 Kbps10.00050.000
Ultimate3,1 Mbps1,8 Mbps18.00090.000
Maksimum Kecepatan Paket Harga Per Paket Bulanan
Nama Paket Kecepatan Download
(sampai dengan)
Kecepatan Upload
(sampai dengan)
1 bulan 6 bulan 12 bulan
Silver512 Kbps128 Kbps75.000400.000750.000
Platinum3,1 Mbps384 Kbps140.000750.0001.400.000
Ultimate*3,1 Mbps1,8 Mbps275.0001.450.0002.750.000

Kalau Anda berada di kawasan Malang dan sudah memakai Smart EVDO, tolong dikasih tahu nama kawasan Anda tinggal. Siapa tahu dekat dengan daerah saya. Apabila tinggal di kawasan lain di luar Malang, mohon diberitahu juga untuk diketahui tetangga sekitar Anda yang mau memakai layanan Smart EVDO.

Older » 24 September 2010 • 6:13 am Speedy Telkom Internet Speed 3 Mbps

speedy telkom internetDaftar lengkap paket koneksi internet Speedy Telkom dari yang limited sampai yang unlimited dengan kecepatan tertinggi 3 Mbps (paket termahal)

Boleh dikata, koneksi internet dari Telkom Speedy merupakan layanan paling luas jangkauannya (coverage area). Ini karena infrastruktur kabel telkom yang tersedia hampir di seluruh Indonesia. Kendati banyak keluhan atas lemotnya (kadang-kadang), atau mahalnya, Telkom Speedy menjadi pilihan utama koneksi internet di banyak daerah di Indonesia. Sambil menunggu para pesaing Speedy seperti Smart EVDO, AHA EVDO, dan Fastnet sampai ke tempat kita, menggunakan Speedy masih menjadi pilihan utama saya.

Berikut daftar paket internet Speedy, harga perbulan dan kecepatan maksimal yang ditawarkan.

NoPaketKecepatanHarga/BulanQuotaKet.
1.Paket MailI MbpsRp 75.00015 JamKelebihan quota bayar  Rp. 75 per menit

2

Paket Load512 kbpsRp. 295.000UnlimitedSetelah pemakaian 3GB speed turun 128 kbps

3

Paket ChatI MbpsRp. 145.00050 JamOver-usage Rp. 25 per menit

4

Paket Familia1 MbpsRp. 645.000Unlimited-

5

Paket Socialia384 kbpsRp. 195.000UnlimitedSetelah 3GB speed turun 128 Kbps

6

Paket Executive2 MbpsRp. 995.000Unlimited-

7

Paket Biz3 MbpsRp. 1.695.000Unlimited-

Untuk info lebih detail, silahkan hubungi 147 (nomor customer service Telkom)

Rabu, 22 September 2010

SUTET ( SALURAN UDARA TEGANGAN EKSTRA TINGGI )

SUTET adalah singkatan dari Saluran Udara Tegangan Ekstra Tinggi dengan kekuatan 500 kV yang ditujukan untuk menyalurkan energi listrik dari pusat-pusat pembangkit yang jaraknya jauh menuju pusat-pusat beban sehingga energi listrik bisa disalurkan dengan efisien.

Berbagai macam kekhawatiran muncul akan dampak SUTET terhadap kesehatan bagi penduduk yang tinggal di wilayah yang dilewati jalur Penelitian dan dampak.
  • Hasil penelitian yang sangat mempengaruhi pandangan masyarakat dunia tentang hubungan kanker otak pada anak dengan paparan medan elektromagnetik adalah hasil penelitian Wertheimer dan Leper tahun 1979, yang sempat menggoncangkan dunia karena risiko positif yang dilaporkannya. Sejak penelitian tersebut, berbagai studi epidemiologi dan laboratorium lainnya dilakukan sebagai replikasi dan eskpansi penelitian Wertheimer di berbagai negara. Namun hasil yang didapat justru beragam, bahkan sebagian besar bersifat kontradiktif. Dilaporkan, studi Feyching dan Ahlboum, 1993, meta analisisnya merupakan penelitian yang mendukung hasil Wertheimer, sedangkan studi National Cancer Institute (NCI) tahun 1997 di Amerika Serikat, studi Kanada 1999, studi Inggris 1999-2000 dan studi Selandia Baru menemukan hasil yang tidak mendukung Wertheimer.
    · Sebuah studi yang dilakukan oleh Dr.
    Gerald Draper dan koleganya dari Chilhood Cancer Research Group di Oxford University dan Dr. John Swanson, penasehat sains di National Grid Transco, menemukan bahwa anak-anak yang tinggal kurang dari 200 meter dari jalur tegangan tinggi, saat dilahirkan memiliki resiko menderita leukimia sebesar 70 persen daripada yang tinggal dari jarak 600 meter atau lebih. Ditemukan lima kali lipat lebih besar kasus leukimia pada bayi yang dilahirkan di daerah sekitar SUTET atau sebesar 400 dalam setahun dari 1 persen jumlah penduduk yang tinggal di daerah tersebut. Secara keseluruhan, anak-anak yang hidupnya dalam radius 200 meter dari tiang tegangan tinggi sekitar 70 persen diantaranya terkena leukimia dan yang hidup antara 200-600 meter sekitar 20 persen dibandingkan dengan yang tinggal lebih dari 600 meter. Walaupun demikian, peningkatan resiko leukemia masih ditemukan pada jarak dimana besar medan listrik bernilai di bawah kondisi di dalam rumah, sehingga disimpulkan bahwa peningkatan resiko leukemia tidak diakibatkan oleh medan listrik atau medan magnet yang diakibatkan oleh SUTET [1]
    · Berdasarkan hasil penelitian Dr. dr.
    Anies, M.Kes. PKK, pada penduduk di bawah SUTET 500 kV di Kabupaten Pekalongan, Kabupaten Pemalang, dan Kabupaten Tegal (2004) menunjukkan bahwa besar risiko electrical sensitivity pada penduduk yang bertempat tinggal di bawah SUTET 500 kV adalah 5,8 kali lebih besar dibandingkan dengan penduduk yang tidak bertempat tinggal di bawah SUTET 500 kV. Secara umum dapat disimpulkan bahwa pajanan medan elektromagnetik yang berasal dari SUTET 500 kV berisiko menimbulkan gangguan kesehatan pada penduduk, yaitu sekumpulan gejala hipersensitivitas yang dikenal dengan electrical sensitivity berupa keluhan sakit kepala (headache), pening (dizziness), dan keletihan menahun (chronic fatigue syndrome). Hasil penemuan Anies menyimpulkan bahwa ketiga gejala tersebut dapat dialami sekaligus oleh seseorang, sehingga penemuan baru ini diwacanakan sebagai "Trias Anies".
    · Corrie Wawolumaya dari Bagian Ilmu Kedokteran Komunitas Fakultas Kedokteran Universitas Indonesia pernah melakukan penelitian terhadap pemukiman di sekitar SUTET. Hasilnya tidak ditemukan hubungan antara kanker leukemia dan SUTET
    [2]
    · John Moulder mencoba menarik kesimpulan dari ratusan penelitian tentang dampak SUTET terhadap kesehatan. Moulder menyimpulkan bahwa tidak ada hubungan sebab akibat antara medan tegangan listrik dan kesehatan manusia (termasuk kanker). Walaupun demikian medan tegangan listrik belum bisa dibuktikan benar-benar aman. Selain itu disepakati juga bahwa jika ada bahaya kesehatan terhadap manusia, maka itu hanya terjadi pada sebagian kecil kelompok
    [3].
    ·
    WHO berkesimpulan bahwa tidak banyak pengaruh yang ditimbulkan oleh medan listrik sampai 20 kV/m pada manusia dan medan listrik sampai 100 kV/m tidak mempengaruhi kesehatan hewan percobaan. Selain itu, percobaan beberapa sukarelawan pada medan magnet 5 mT hanya memiliki sedikit efek pada hasil uji klinis dan fisik [4]

Jaringan melalui kabel listrik ? kenapa tidak ....

Tulisan ini merupakan tulisan yang telah di sampaikan pada seminar nasional sistem informasi pada tahun 2006.  Semoga masih bermanfaat bagi pembaca

1. PENDAHULUAN

Jaringan komputer adalah suatu tata cara berkomunikasi antara sumber daya informasi satu dengan lain melalui medium transmisi.  Medium transmisi yang dapat digunakan dalam melakukan transmisi data dapat dikategorikan dalam 3 (tiga) jenis media[1], yaitu :

a.   Kabel

b.   Udara, dan

c.   Cahaya

Media transmisi kabel saat ini merupakan salah satu media transmisi data yang cukup popular digunakan dalam melakukan komunikasi data antar sumber daya informasi, walau beberapa tahun terakhir ini keberadaannya mulai digeser oleh teknologi wireless yang memanfaatkan gelombang elektromagnetik sebagai media transmisi datanya.

Seiring dengan tumbuh dan berkembangnya suatu organisasi, kebutuhan akan koneksi sumber daya informasi menjadi bertambah sehingga pada suatu waktu infrastruktur jaringan yang tersedia tidak sanggup memenuhi kebutuhan organisasi tersebut. Penggunaan sarana komunikasi data dengan menggunakan perangkat wireless menjadi satu pilihan dalam upaya memenuhi kebutuhan tersebut.

Beberapa kasus, penggunaan perangkat wireless masih terkendala pada bentuk tata ruang yang ada, seperti pada gedung perkantoran bertingkat, karena sinyal komunikasi yang dikirim tidak dapat menembus ruang bertingkat.  Penambahan kabel komunikasi seperti UTP, coaxial maupun fiber-optic antar tingkat dalam gedung tersebut memiliki tingkat kesulitas tersendiri, apalagi jika perencanaan pembangunan awal dari gedung tersebut tidak memikirkan kemungkinkan pengembangan infra struktur teknologi informasi.

Pemanfaatan jaringan listrik tegangan rendah sebagai alternatif transmisi data melalui media kabel yang dikombinasikan dengan media transmisi lain baik melalui kabel UTP, coaxial maupun wireless dapat merupakan salah satu pilihan karena ketersediaan secara umum telah tersedia di gedung-gedung perkantoran dimana organisasi tersebut berada.

Rabu, 25 Agustus 2010

Cara Rahasia Internetan Gratis Dengan Kartu IM3

Kali ini saya akan tulis postingan yang cukup menarik yaitu Cara Rahasia Internetan Gratis Menggunakan Kartu IM3. Cara rahasia internetan gratis ini sebenarnya sudah banyak diketahui ama orang – orang pinter ( lho, brarti eCHO pinter dunk cool ). ngga juga seh, asalkan kita banyak surfing diInternet lama – lama juga bakal nemuin trik ini.
okeh dekh, langsung yah. ( maaf, mungkin posting kali ini bahasanya sedikit tingkat tinggi lol )
Akses internet gratis menggunakan kartu IM3 tidak perlu software segala macam, hanya saja pengaturan beberapa di modem kita, dan kemudian di sini teman – teman COba :
* Pertama
a. Membuat profil baru di modem Anda dengan nama indosatmms ( ingat bukan indosatgprs !! )
b. Isi Username dengan indosatmms
c. Isi password dengan indosatmms
d. Dengan APN dapat mengisi dengan indosatmms atau indosatgprs
e. DNS diisi dengan: 208.67.222.222 dan 208.67.220.220
* Kedua:
Fase kedua adalah fase input proxy. Caranya, buka Mozilla, pilih menu tool -> Option-> Advance -> Network -> Setting -> Manual proxy. Proxy yang terisi adalah 10.19.19.19 dan pada kolom port diisi oleh 8080.
Gunakan server proxy ini karena aman bebas dari hacker evil.
SELAMAT MENCOBA !! SILAHKAN BERKOMENTAR JIKA BINGUNG !!

Sabtu, 14 Agustus 2010

How-To: Clone or Copy a VirtualBox Virtual Disk

As a virtual machine environment user, I regularly create ‘base’ images of machines that I can reuse – a base Windows Server 2003 environment, or SQL Server 2005 environment for example. That way, when I need a new machine, I can simply create a copy of the virtual disk and add any additional software I need, saving myself valuable time creating new virtual environments.

With VMWare’s various offerings, copying a virtual disk is easy: copy the disk in Windows Explorer and add it to a newly created VM; VMWare will detect that the disk was a copy and create a new unique identifier (UUID) for the disk before adding it to the VM. Easy and painless. Not so with VirtualBox.

With VirtualBox, copying a virtual disk is a bit of a pain. If you copy the disk in Windows Explorer and try and use it in a new VM, VirtualBox will have a hissy fit and display the error shown below. A bit of a ‘wordy’ way to say that it already knows about this disk, don’t you think?
VirtualBox - Add Copied Virtual Disk - Duplicate UUID Error


The publicised way around this is to use the command-line VBoxManage CloneHd tool, however there is another – secret and undocumented – way to clone a disk: the setvdiuuid tool. Lets look at these two methods in detail.

Cloning a Virtual Disk – The ‘Supported’ Method
Cloning a disk is (IMHO) a clunky and Unix-y type way of creating a duplicate disk. We need to invoke the CloneHd command of the VBoxManage tool, supplying the disk to clone and the name of the new ‘cloned’ disk. In its simplest form, you would do something like this at the command-line:

VBoxManage clonehd "DiskToClone.vdi" "ClonedDisk.vdi"

The VBoxManage tool will chug away and clone the disk for you, creating a new UUID in the process:
virtualbox-clonehd-2


The cloned disk can now be used on a new VM without incurring the ‘I already know about this disk’ error.

Copying a Disk – The ‘Unsupported’ Method
The alternative to the CloneHd tool is an undocumented option available in VBoxManage – the setvdiuuid command. As the command help states: ‘This is a development tool and shall only be used to analyse problems. It is completely unsupported and will change in incompatible ways without warning’. Because of this, let me add a little disclaimer: I don’t accept any responsibility if you completely destroy your VM using this procedure. Having said that, it appears to work without issue, so I’m more than happy to use it myself – just make sure that you take a backup of you virtual disk before using it if necessary.

To use the tool, simply create a copy of the virtual disk’s VDI file in Windows Explorer; open the Windows command-line and issue the setvdiuuid command for the newly copied disk:

VBoxManage internalcommands setvdiuuid "CopiedDisk.vdi"

The tool will create a new UUID and assign it to the disk:

virtualbox-setvdiuuid

The new copied disk can now be used on a new VM without incurring the ‘I already know about this disk’ error.


Read more: http://www.modhul.com/2009/06/17/how-to-clone-or-copy-a-virtualbox-virtual-disk/#ixzz0waZGAv3p

Selasa, 03 Agustus 2010

http://sentientmobile.com/jshaw/blog/post/2009/08/26/Running-VirtualBox-on-a-Windows-Vista-bootcamp-partition-in-Mac-OS-X.aspx


VirtualBox is an open-source virtualization software from Sun much like VMWare and Parallels, but free for personal use!  I just tried it out on my Mac OS X to run a Windows Vista VM on a physical Windows Vista partition created through bootcamp, and thought I'd share my experience (and to write down for myself for future reference :)).  


I had googled and found someone doing very similar thing on a Ubuntu machine.  Most of the info is pretty relevant on a Mac OS X as well, except that I couldn't use the solution of assigning my user account to the "disk" group; there's no "disk" group on Mac OS X.  The other solution mentioned of changing permission works however.  Here's exactly what I did:


0. Read the relevant part of the VirtualBox User Manual regarding using raw partition ("9.10.2 Access to individual physical hard disk partitions").


1. Locate the device and partition holding your Windows Vista partition (e.g, using "df -k" command):


jshawsworlds-macbook:~ jshawsworld$ df -k

Filesystem    1024-blocks     Used Available Capacity  Mounted on

/dev/disk0s2     73269248 31999364  41013884    44%    /

devfs                 110      110         0   100%    /dev

fdesc                   1        1         0   100%    /dev

map -hosts              0        0         0   100%    /net

map auto_home           0        0         0   100%    /home

/dev/disk0s3     82685740 56175456  26510284    68%    /Volumes/Untitled

/dev/disk1s1        15632      144     15488     1%    /Volumes/CANON_DC

/dev/disk2s1    334784000 46614707 288169292    14%    /Volumes/My Book

/dev/disk2s2    153600000 29766376 123833624    20%    /Volumes/Mac OS Partition 2


For me, for example, I know the Windows partition is /dev/disk0s3.


2. Back up your existing Windows Vista partition, to a external drive for example, since you might damage the Windows paritition in this exercise and render it unusable!  One free tool I find pretty reliable in backing up and restoring Windows partition is winclone.


3. Change to root to do the next few commands:


sudo su


You may need to enable root user by going to the "Directory Utility" app, click on the lock icon, and then Edit->Enable Root User.


4. Unmount the Vista partition in Mac OS X if you currently have it mounted, since we don't want VirtualBox accessing it at the same time that Mac OS is accessing it:


umount /dev/disk0s3


and make sure it has been unmounted (i.e.,  the directory /Volumes/Untitled is empty in my case).


5. Change the device to read/write, which is needed by VirtualBox as stated in the user manual:


chmod 666 /dev/disk0*


Note that you have to change permission for all of disk0, not just the Windows parition (hence the "disk0*"), since createrawvmdk needs to access disk0 as well as disk0s3.


6. Run the command


VBoxManage internalcommands createrawvmdk -filename /Users/jshawsworld/WinVista.vmdk -rawdisk /dev/dev0 -partitions 3 -relative


7. Finally change the owner to your user account for the vmdk file you just created as root, so you can access it as yourself when running VirtualBox later:


chown jshawsworld /Users/jshawsworld/*.vmdk


8. Run VirtualBox from Finder, and browse to the vmdk file. 


9. Make sure that "IO APIC" and "VT-x/AMD-V" in your Virtual Machine Settings are both on, and then start the VM.  It should start.


Even though I got it working, it was painfully slow..., even after giving it 2 GB of memory.  I had tried VMWare Fusion to do the same thing before, and remember it wasn't any faster.  To really work efficiently in Windows I think booting to it via bootcamp is still the way to go.  XP might be faster; who knows maybe Windows 7 will be much faster.  For light-weight OS's (like Linux) running it as a VM is definitely the way to go.

Minggu, 01 Agustus 2010

How To Convert VMWare Image (.vmdk) to VirtualBox Image (.vdi)

I’ve found more and more people are switching to Virtualbox these days and I keep running into the same question.  ”How can I convert my VMware images to Virtualbox images?”  Well, breath easy because it is possible and not very difficult!

There are two methods that I am aware of that will allow you to use your VMware images on Virtualbox.  The first method I’ll outline uses the graphical Virtualbox interface and the second uses the command line. Each method should be equally as stable, it simple depends on your preference.

Method 1

Start Virtualbox
Inside the Virtualbox Menu click: File > Virtual Media Manager
Click on the “Add” button.
Locate and select the VMware .vmdk file you’d like to convert.
Click Open.
Verify your disk image has been added to the list of images and that the virtual and actual sizes appear accurate.
Click OK
Create a new virtual machine profile, selecting your imported image for the storage.
Boot your new virtual machine.

Method 2
To use the second method we’ll need an addition command-line tool called qemu.

sudo aptitude install qemu

You’ll new be able to convert a .vmdk (VMware image) to a .bin format, which can then be converted to a Virtualbox native .vdi format.

qemu-img convert /path/to/original.vmdk converted.bin

You’ll then need to use the VBoxManage utility that comes with Virtualbox to convert the .bin to a native .vdi format:

VBoxManage convertdd converted.bin converted.vdi

You can now create your new Virtualbox machine profile, using this new .vdi file as your disk image.

Two methods for converting VMware images to Virtualbox images.  Are there any other methods that you can suggest, or have you had better experience with one or the other?  Let us know!

Senin, 19 Juli 2010

DASHBOARD WIDGETS ON MY MAC OS X DESKTOP?

I've fallen in love with Dashboard on my new Mac OS X Tiger system, but I hate having to type f12 to get them to show up. Is it possible to have my dashboard widgets show up on my regular desktop?


Dave's Answer:

It's not only possible, but it's pretty easy and darn fun! Here's what you need to do...

First, open up Terminal (Applications --> Utilities --> Terminal) and type in the following, exactly as you see here:

defaults write com.apple.dashboard devmode YES

You can just copy and paste from this Web page if you're concerned that you might type in something incorrectly, of course.

You'll get another regular system prompt within Terminal if it works, there's no other output to the defaults program.

Now log out of your account by choosing Apple --> Log Out, and log in again (You need to restart Dashboard).

Ready for the fun now? Press f12 to bring Dashboard up, then drag one of your Dashboard widgets around. While you're still dragging it around (that's critical: keep that mouse button down!) press f12 again.

Poof! Your Dashboard vanishes, but the widget's still visible. Move it to where-ever you want on your screen and it's there, running, fully functional, without the rest of Dashboard around!

You'll notice that it lives above everything else on your screen (at least, I don't know how to push it behind other app windows) so I think you'll have the best results with small widgets that can be tucked into a corner or lined up neatly on an edge.

To move the widget back into the Dashboard world, reverse the trick: begin dragging the widget, then, while still keeping the mouse button down, press f12, then let go of the mouse button. The widget will be restored to its regular Dashboard layer.

dashboard widget on the Mac OS X desktop

In the screenshot above, you can see the dashboard Weather widget floating above Safari and adjacent to the little floating clock from the Date and Time System Preference.

This is a really cool little hack that I like a lot! My thanks to William Ayer for his help on this.

Rabu, 14 Juli 2010

Using SSI with WordPress


Server Side Includes (SSI) are a very powerful tool that can be
used to update multiple pages on a site quickly and with minimum fuss.


e.g. Imagine you had a site and you wanted to include a list of
recommended merchants at the bottom of every page.  What happens if one
of the merchants changes their affiliate link, or drops you as an
affiliate, or simply does not convert?  If you site had 100 pages, you
would have to manually update 100 pages and re-upload all 100 pages. 


With SSI, you would have this list of merchants in a single text
file.  You would then “include” that text file in all of the pages on
your site.


If you need to change a link, you simply change the link in the text
file and re-upload that one file.  The merchant list will then be
updated on every single page of your site.


Typically I’ll have 4 or 5 of these “merchant files” for any site I
build.  The list of merchants and ads shown in these files will be
geared towards the section on my site in which they will appear.  e.g.
on a contact lens site, I would probably have one merchant file for the
pages advertising prescription lenses, and another merchant file for
cosmetic lenses (those lenses that are just for appearance).  I might
even have a separate file for “halloween lenses”, and include photos of
vampire eyes, or cats eyes – whatever is hot at the moment.


By keeping my merchant lists to a few separate files, I can quickly
and easily swap out merchants, add in new promotions (e.g. at Halloween
there are always special offers, and these can be added to all
“Halloween” related pages in a few seconds) and have total control over
what ads are showing on the various sections of my website.  If changes
need to be made, I don’t need to edit every page on my site, just my
include files.


Do you see the power of this?


To help with SSI in WordPress sites, there is a plugin I recommend.  I
have it working on a WordPress 2.7.1. installation so can confirm it is
compatible with this version of WordPress.


WordPress Plugin: Include
It


Download and install it.


Now, in an HTML editor (or text editor if you prefer), create the
file that you want included in your pages.   Construct it in standard
HTML.  It can include a table, headers, affiliate links, text, images
etc.  When you have finished the include file, save it to the root
folder of your site.  You can give it any name you want, e.g.
merchants.txt, merchants.html etc.


Now, with the plugin active, simply add the following code in the
position of your WordPress post that you want the merchant list to
appear:


[include file=merchant.txt]


Save your post, and you are finished.


The contents of the merchant.txt file should display in the post.


Add this line to every post you want the list to appear in.  When you
need to change the merchant list, simply edit the merchant.txt file,
and upload it.  The merchant list will be updated on every page that you
added it to.


Do you have any other uses of SSI that you think readers of this blog
would be interested in?  Please feel free to leave comments on this
article below.  You do not need to register to leave a comment.

Sky Drive Attachment WLW Plugin 1.0

Windows Live SkyDrive is a special service that is
provided by Microsoft
for free. It allows you to store and access your personal files from
anywhere online & it gives you an enormous 25GB space. If you are a
blogger and use Windows Live SkyDrive as your online storage then Sky Drive
Attachment WLW Plugin 1.0 is a must for you. As the name says this
plugin is compatible with all the versions of Windows
Live Writer
and is supported on Microsoft Windows XP and Windows
Vista. This plugin is pretty simple to use. It allows you to access and
manage your Windows Live SkyDrive
account right from Windows Live Writer interface. You can use Windows
Live SkyDrive Attachment
Plugin to upload, and use your file within your blog posts as
attachments. All you have to do is insert your login details and all the
files are shown, now you can select the files which you want to use as
an attachment. For easier access this plugin can
also be used from the sidebar of Windows Live Writer. It is an essential
plugin for Windows
Live
Skydrive user, go and download it now!
Sky Drive Attachment WLW Plugin 1.0 in sidebar
Sky Drive Attachment WLW Plugin 1.0 in WLW Plugin ListSky Drive Attachment WLW Plugin 1.0 Asking for Login Details

Selasa, 13 Juli 2010

Cara Mengubah Tampilan iklan kumpulblogger

Aduuh bingung juga ya ama iklan kumpulblogger,tidak dapat disesuaikan
dengan template blog kita,lihatlah template blogku ini yang serba
gelap,sedangkan script dari iklan kumpul blogger hanya menampilkan putih
saja dan gak ada menu untuk mengubahnya sesuai dengan template
kita,tapi jangan takut deh...mungkin dengan tutorial yang satu ini
kalian bisa tersenyum kembali,cos tampilan iklan kumpul blogger akan
bisa kamu sesuaikan dengan template blog kamu.ni jalan alternatif juga
agar blog kamu tetep terlihat bagus,ha ha ha.....
Caranya
mudah kok,lihat langkah2 dibawah ini:
  • Login Ke blogger
  • Masuk
    ke Dasbor,
  • klik Tata Letak.
  • klik Edit HTML.
  • Pilih
    atau beri tanda cek pada "Expand Template Widget" download dulu
    template kamu untuk keamanan.
  • Cari kode <b:skin><![CDATA[
  • Kalo sudah
    ketemu letakkan kode dibawah ini tepat setelah kode <b:skin><![CDATA[

    .garping,.garpinghor
    {

    border: none
    !important;

    }
    .garping table,.garpinghor table {
    border:#FFFFFF solid 1px !important;
    background-color:#FFFFFF !important;
    }
    .garping td,.garpinghor td{
    color:#000000 !important;
    background-color:#FFFFFF !important;
    font-family:arial !important;
    font-weight: !important;
    font-style: !important;
    }
    .garping a,.garpinghor a{
    color:#000080 !important;
    font-family:arial !important;
    font-weight: !important;
    font-style: !important;
    }
    .garping a:hover,.garpinghor a:hover{
    color:#FF0000 !important;
    }
  • Sehingga akan menjadi seperti dibawah ini:

    <b:skin><![CDATA[.garping,.garpinghor {
    border: none !important;
    }
    .garping table,.garpinghor table {
    border:#FFFFFF solid 1px !important;
    background-color:#FFFFFF
    !important;

    }
    .garping td,.garpinghor td{
    color:#000000 !important;
    background-color:#FFFFFF
    !important;

    font-family:arial
    !important;

    font-weight:
    !important;

    font-style:
    !important;

    }
    .garping a,.garpinghor a{
    color:#000080 !important;
    font-family:arial !important;
    font-weight: !important;
    font-style: !important;
    }
    .garping a:hover,.garpinghor a:hover{
    color:#FF0000 !important;
    }
  • Simpan
    template.
  • Untuk meletakkan iklanya terserah kamu, bisa di
    sidebar seperti saya misalnya,tapi kamu letakkan script seperti berikut
    dibawah ini:

    <div style="overflow:hidden;width:430px;height:250px;padding:10px"> kode iklan kumpul blogger di sini
    </div>

  • Dan
    untuk ukuran kamu bisa ganti yang berwarna merah itu sesuai ukuran yang kamu kehendaki.ok,semoga
    bermanfaat!

Using server-side includes (SSIs) to add content to your web pages

What is an SSI?

A server-side include is code in a web page that tells the
server to add some specified information at that point in the page. It's
a way to extend the content of your page in some useful ways.


Caution: SSIs don't work on every web
server, and the details vary from one to another. This page describes
features which I know work on Apache and Microsoft IIS servers, and are
probably applicable to others.


Ask your web hosting company if (a) you can use SSIs, (b) what file
naming conventions you have to use for them to work, and (c) where you
should keep the files that use them. Then, as long as the answer to (a)
is yes, you can get started.


How do they work?


Unless otherwise instructed, a web server just sends the content of a
web page to the client, your browser. But for an SSI to work, the
server must parse (read) the file, find all the SSIs, and process them
before sending the content to the browser.


The web server can be set up to parse all files (not usual), in which
case, you can name your files with the usual .htm
or .html extensions. However, the usual case is
to have a specific extension set up for parsed files - usually .stm, .php or .asp.
If you use the wrong extension, the SSIs will just be ignored. The
folder that holds them must have appropriate execute or scripting
permissions too, or they will not work.


What can they do?


There are three main uses: to take standard text from another file
and insert it into the page (include files), to insert the value of a
variable quantity into the page, or to run a CGI script other than as
the action of a form.


I'm going to cover the basics here: include files, and some
variables. Many ISPs forbid the running of executables this way because
it can be a security risk, so I'm not going to discuss them here. If you
want detailed information on everything that can be done, a useful
starting point is the link to external site Apache site, or if you have a commercial web
server, the manufacturer's site or the online help should have details
of which directives and variables are available for its product.


Including files


To include some standard text (for example, a disclaimer or
copyright), put one of these lines in your parsed web page where you
want it to appear:


<!--#include file="<em>filename.ext</em>" -->
<!--#include virtual="<em>/path/filename.ext</em>" -->

Note that although this looks like an HTML comment, you must put a
space before the closing -->. Use the first
form if the file is in the same directory or you are specifying a
relative pathname (e.g. ../../copy.inc); the
second for an absolute path (e.g. in another virtual directory - /includes/footer.inc), but never a full HTTP URL. The
file should contain either plain text or HTML markup (inbcluding scripts
of couurse), and can have any name you like, though a .inc
extension is conventional.


Example:


If the file copy.inc includes this text:


<p>The complete contents of this site are copyright <br />&copy; Lois Wakeman 1999-2008 except as expressly noted.</p>

then, if you have this code in your web page:


<!--#include file="copy.inc" -->

you will see this in the browser:


The complete contents of this site are
copyright © Lois Wakeman 1999-2008 except as expressly
noted.


Adding variables to the page


The web server has access to certain standard variables and file
information, which you can put in your page. The most useful for the web
page author are probably:


  • <!--#flastmod virtual="/path/filename.ext"
    -->
    , and its file equivalent, which return the last modified
    date for the specified file.
  • <!--#fsize virtual="/path/filename.ext"
    -->
    , and its file equivalent, which return the size of the
    specified file.

    For example, on a downloads page, it might be useful to have this
    code:


    <a href="/help/styles.zip">Download</a> this file,<br />size <span class="highlight"><!--#fsize virtual="/help/styles.zip" --></span><br />(last updated on <span class="highlight"><!--#flastmod virtual="/help/styles.zip" --></span>).

    which appears in the browser like:


    Download
    this file, size Kb
    (last updated on ).


  • <!--#echo var="variable" -->,
    which returns one of a number of variables concerning the web server's
    environment, the current page, how it was fetched, by whom, etc. Some
    variables that may be useful for web pages are DOCUMENT_URI,
    DATE_GMT, DATE_LOCAL,
    and LAST_MODIFIED, for example:
    • This document can be found at http:/
      - variable DOCUMENT_URI
    • It's
      in Uplyme - variable DATE_LOCAL
    • The page was last modified on
      - variable LAST_MODIFIED


Pros and cons


If you have a large site with a lot of common page elements, include
files can make a big difference to how easy it is to maintain the site.
Instead of updating, say, 50 pages with the same menu or navigation bar,
you can just update the include file once.


Because all the processing is done at the server, you do not
introduce any browser compatibility problems using them. For example,
you can insert the last modified date using JavaScript, but that won't
work for everyone.


Because a page containing SSIs must be parsed, there is a small
processing overhead, but this is not generally significant in my
experience - though a very long page might be noticeably slower to load,
I guess. (But you don't have any of those, do you?)


If you have made a mistake on a parsed page (for example, an include
file cannot be found because the path is wrong), users will get a
message different from the familiar 404 error, which may confuse them
(for example, error processing test.asp file).
This is only a problem if you don't test your pages properly before
publishing them!


So, on balance, if you need the facilities offered by them, I'd say
they were worth the trouble of learning and using.

JavaScript "document.write"

One of the most basic JavaScript commands is document.write.
This simply prints the specified text to the page. To print text
literally, enter the text in single quote marks inside parentheses like
so:


	document.write('Hello World!');

The code above will cause the phrase "Hello World!" to appear on the
page.


You can also use document.write to print
variables. Enter the variable name without quotes, like so:


	var mytext = "Hello again";<br />	document.write(mytext);<br />

Note that if quote marks are placed around the variable name, the
variable name itself will be printed (instead of the variable value).
You can also combine variable values and text strings by using the +
sign:


	var colour1 = "purple";<br />	var colour2 = "pink";<br />	document.write('<p>colour1: ' + colour1 + '<br>colour2: ' + colour2 + '</p>');<br />

Notice the way the variable names are used literally as well as for
passing the values. This will print the following:


colour1: purple
colour2: pink


Remember, text inside quotes will be printed literally, text with no
quotes is assumed to be a variable.

colour1: purple
colour2: pink

How to Update Multiple Web Pages Using JavaScript

Using JavaScript, you can create a separate file which contains
content for your web page. To update all the pages simultaneously,
simply update the JavaScript file.

Pros:


  • Easy to implement.
  • Does not rely on any special HTML extension or server configuration.


Cons:


  • Relies on the user having JavaScript enabled.
  • Updates are more tricky than other methods.


Step 1: Create JavaScript File


Create a plain text document and name it with a .js
extension, for example masterscript.js.
Using the JavaScript document.write
method
, enter the content you want to be displayed on every page
like so:


document.write("<div style='color:blue; font-size:12pt;'>");

document.write("© Copyright Myname 2004");

document.write("</div>");


Note: You don't need to include script tags in this file.


Step 2: Add JavaScript Code to Pages


On every page where you want the content to appear, insert the
following code:


<script language="JavaScript" type="text/javascript"
src="masterscript.js">

</script>


To change the content on every page, edit the contents of the masterscript.js file.


How to Update Multiple Web Pages Using Server Side Includes

SSI (Server Side Include) is a simple and robust way to include
common content in multiple pages. In a similar way to the client-side JavaScript method, SSI involves having a separate file which contains the content you wish to appear on multiple pages. To update the content, you only need to edit a single file.

Pros:
  1. Server-side is safer than client-side (it doesn't rely on any
    browser settings).
  2. Updates are very fast and easy.

Cons:

  1. Slight performance overhead at the server end (every SSI page needs
    to be processed by the server before it is served to the user).
  2. You usually need to use a special extension for web pages, e.g. .shtml.
  3. The server must support Server Side Includes (most Apache servers
    do).


Step 1: Create the SSI File


Create a plain text document and name it with a .txt extension, for example navigation.txt. Save
this file in a folder which is accessible from your whole website. You  may want to make a special folder for this type of file, e.g. /includes/.

Into this file, enter the content you want to be displayed on every  page, for example:


<div style='color:blue; font-size:12pt;'>

<a href="page1.shtml">Page 1</a> | <a
href="page2.shtml">Page 2</a> | <a
href="page3.shtml">Page 3</a>

</div>


Step 2: Insert the SSI Code into Your Pages


On each page, at the point where you want to the content to appear,  place the following code:

<!--#include virtual="/includes/navigation.txt"
-->

To update the content, simply edit the main SSI file and all pages  will automatically update.


Notes:

  • In most cases you will need to change the file extension of your web
    pages to.shtml. If this doesn't work, ask
    your provider for help.
  • If you're creating your pages on a home computer, the SSI includes
    will not show up unless you're running a personal web server. You will
    probably need to upload the pages to your website before you see it all
    work properly.


Selasa, 06 Juli 2010

How to Easily Create RSS Feeds For Your Website!

All the most popular sites provide RSS feeds these days,and you can too!It's simple really!
RSS stand for really simple syndication,or it's sometimes referred to as a rich site summary.It's an XLM-based content format for distributing news,headlines,content,etc.All the most popular sites provide RSS feeds these days,and you can too!It's simple really!
1 All you need is a feed reader,and you can download the feeds from virtually any site that offers them.
Step-2 Firefox has one built in to the browser.Google,Yahoo,and Live all have a way for you to collect your favorite feeds,so the choice is entirely up to you!

Step-3 You can also create feeds for your own websites so your audience can subscribe to them.If done right,you can instantly drive more traffic to your site on a regular basis.This is also an excellent way to bring more repeat traffic to your site(s) .
Step-4 First you need to build your feeds.
Feedforall.com has an easy to use feed builder that lets you create,and manage all your feeds in one place.

Step-5 Or you can use a blog instead.
You can create a free blog at Blogger.com,and the RSS feed URL is automatically generated for you.Word Press is another site that offers a free blog equipped with RSS feeds.
Step6 One of the easiest ways to announce your feed on your site is to use FeedBurner.com.They provide a redirect URL (address)for your feed that your audience can subscribe to.
Step7 You will absolutely rave to friends about FeedBurner.com,because they provide several methods for announcing your RSS feeds!


Read more: http://www.bukisa.com/articles/74181_how-to-easily-create-rss-feeds-for-your-website#ixzz0swZq9qgo